How to Disassemble Canon MP780/MP760 Printer to replace the Waste Ink Pads
There are four different types of screws and you want to get them back where they came from. To help you keep the screws straight, I have labeled the photographs with letters corresponding to each screw type. Here are the screw types:
A: medium length plastic screw.
B: short machine screw with integrated washer.
C: longer plastic screw with integrated washer.
D: shorter plastic screw.
Before you attempt this process, you should remove the cartridges, do a deep head cleaning followed by a nozzle check and repeat until nothing prints. Then remove the print head and unplug the printer with the carriage still in the center of the printer.
You will need a medium Phillips screwdriver with a long shaft (at least five inches long).
Start by removing the two side panels. First remove these two screws from the front of the printer:
Canon MP 780 / MP 760 Disassembly Guide
Remove these four screws from the rear of the printer:

Now pry off the back of each side panel over the two posts that the rear screws were removed from, pull each panel away from the printer and forward to release it from the printer. Be very careful of the timing wheel exposed on the left side of the printer during subsequent handling. You don't want to get it dirty or damage it.
Next you have to remove the scanner unit. This is the most difficult part of this job. Remove all the wires and cables that pass from the scanner along the right hand hinge point being very careful to note where each cable goes. Some of the ribbon cables are held tightly in their connectors with a locking frame. You need to pull these out (but not off) to release those ribbon cables and of course you have to press the frames back in after you carefully return the cables to their proper positions. You also have to remove a couple plastic retainers. Look carefully at how they snap into place so that you can unsnap them without breaking them. It would be a good idea to take pictures and notes so that you can get it back together again. Here are pictures of this area for the MP760 (the MP780 is slightly different):


Right rear:

Left front (get the correct screw, it's the one in front):

And finally right front (you won't see this unless you raise the scanner handle):

Make sure the handle for lifting the scanner (which has been removed) is latched down and simply lift the top of the printer away.
Now you can see much of the printer mechanism. There is a total of seven or eight screws that need to be removed. (Disregard the sight of cables going everywhere, these pictures were taken from one of the printers that was broken and I was not concerned about restoring it.)
Two screws on the left side of the printer:

Two or three screws from the right rear of the printer (the one in the middle is higher than the other two and don't remove the two screws holding ground wires):

And three more screws near the right center of the printer:

Before you can lift the printer mechanism and the electronics board away from the base, you need to disconnect the wires that go to the left side of the electronics board (near the front of the printer) that are not colored orange or yellow. On the MP780 there are two pairs of wires and on the MP760 there is just one. The picture above shows these two wire pairs for the MP780 disconnected. These wires go along the underside of the printer to the other side.
Slide the carriage as far right as it will go.
Before you remove the printer mechanism from its base, you should observe the positions of a couple of white cams as seen circled in yellow in this picture:

Don't worry if they come loose while you are removing the printer mechanism, just remember to put them back where they belong when re-assembling. Here is a closeup of the one on the right:

Lift the mechanism up by the metal bar that goes across the top of the printer. As you first start to lift it, some orange cables near the front need to be unpositioned from their plastic guides in the base. Note how they are positioned so that you can get them back in the same orientation. This picture shows how these orange cables are positioned and how you need to return them when you are putting the printer back together:

When you get the printer mechanism removed, this is what you'll see:

Now you can easily remove the waste ink pads and clean up all the residual ink from the various plastic parts. Thoroughly dry it before installing new pads.
You may also want to remove and wash the thin black sponge unit that runs the width of the printer. Also clean the wiper blades and the two purge pads. When you put them back, the notch goes in the left rear corner.
Reassemble the printer by reversing all the steps. To help guide the printer into the base, look at the back of the printer and line up the door into the base unit. Make sure those two white tabs are inserted where they belong and are engaging the proper posts and make sure the orange wires make their way across their restraining tabs. Make sure you plug in the wires that run along the base of the printer.
When putting the printer top on the printer, look at the back again and line up the door into the printer top.
A: medium length plastic screw.
B: short machine screw with integrated washer.
C: longer plastic screw with integrated washer.
D: shorter plastic screw.
Before you attempt this process, you should remove the cartridges, do a deep head cleaning followed by a nozzle check and repeat until nothing prints. Then remove the print head and unplug the printer with the carriage still in the center of the printer.
You will need a medium Phillips screwdriver with a long shaft (at least five inches long).
Start by removing the two side panels. First remove these two screws from the front of the printer:

Canon MP 780 / MP 760 Disassembly Guide
Remove these four screws from the rear of the printer:

Now pry off the back of each side panel over the two posts that the rear screws were removed from, pull each panel away from the printer and forward to release it from the printer. Be very careful of the timing wheel exposed on the left side of the printer during subsequent handling. You don't want to get it dirty or damage it.
Next you have to remove the scanner unit. This is the most difficult part of this job. Remove all the wires and cables that pass from the scanner along the right hand hinge point being very careful to note where each cable goes. Some of the ribbon cables are held tightly in their connectors with a locking frame. You need to pull these out (but not off) to release those ribbon cables and of course you have to press the frames back in after you carefully return the cables to their proper positions. You also have to remove a couple plastic retainers. Look carefully at how they snap into place so that you can unsnap them without breaking them. It would be a good idea to take pictures and notes so that you can get it back together again. Here are pictures of this area for the MP760 (the MP780 is slightly different):

After all the cables and wires are off the connectors (and the grounding wires unscrewed), gently pull the wires up through their feed holes up to the top of the printer.
If you are working on an MP780, you can remove the upper part of the scanner. Open the cover until it is pointing almost straight up and then pull it out from the bottom scanner. You will have to wiggle it to get it free. Be careful of the wires on the right side. Bypass this step if you are working on an MP760.
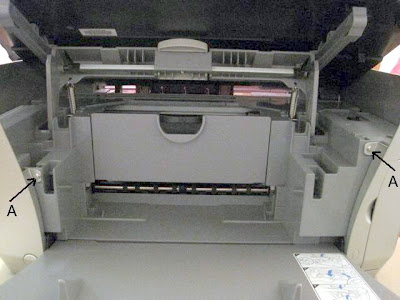
Next you will have to remove the two grey guides shown at the top of the first picture on this post. You do this by holding the scanner part way up so that the handle that you use to raise and lower the scanner is somewhat forward. Pull down on the top center of the guide and after the semi-circular protrusion is below its lock, slide the guide forward and remove it. Repeat for the other guide. Pay close attention to how these guides are removed so that you can get them back in place and be very careful that you don't break the semi-circular protrusion. It breaks very easily and if it does break, the guides will not stay in place unless you use an adhesive (tape or glue).
Now you need to remove the bottom portion of the scanner from the printer (or the entire scanner if you have an MP760). Do this by opening it until it is straight up and lift it right out of its hinge points.
Now with the scanner out of the way, you can remove four screws that hold the top of the printer in place. These four screws are located in approximately the four corners of the printer but you will have to raise the handle for the scanner to get to the one in the right front corner. Here are pictures of the screws in the four corners:
Left rear:
If you are working on an MP780, you can remove the upper part of the scanner. Open the cover until it is pointing almost straight up and then pull it out from the bottom scanner. You will have to wiggle it to get it free. Be careful of the wires on the right side. Bypass this step if you are working on an MP760.
Next you will have to remove the two grey guides shown at the top of the first picture on this post. You do this by holding the scanner part way up so that the handle that you use to raise and lower the scanner is somewhat forward. Pull down on the top center of the guide and after the semi-circular protrusion is below its lock, slide the guide forward and remove it. Repeat for the other guide. Pay close attention to how these guides are removed so that you can get them back in place and be very careful that you don't break the semi-circular protrusion. It breaks very easily and if it does break, the guides will not stay in place unless you use an adhesive (tape or glue).
Now you need to remove the bottom portion of the scanner from the printer (or the entire scanner if you have an MP760). Do this by opening it until it is straight up and lift it right out of its hinge points.
Now with the scanner out of the way, you can remove four screws that hold the top of the printer in place. These four screws are located in approximately the four corners of the printer but you will have to raise the handle for the scanner to get to the one in the right front corner. Here are pictures of the screws in the four corners:
Left rear:

Right rear:

Left front (get the correct screw, it's the one in front):

And finally right front (you won't see this unless you raise the scanner handle):

Make sure the handle for lifting the scanner (which has been removed) is latched down and simply lift the top of the printer away.
Now you can see much of the printer mechanism. There is a total of seven or eight screws that need to be removed. (Disregard the sight of cables going everywhere, these pictures were taken from one of the printers that was broken and I was not concerned about restoring it.)
Two screws on the left side of the printer:

Two or three screws from the right rear of the printer (the one in the middle is higher than the other two and don't remove the two screws holding ground wires):

And three more screws near the right center of the printer:

Before you can lift the printer mechanism and the electronics board away from the base, you need to disconnect the wires that go to the left side of the electronics board (near the front of the printer) that are not colored orange or yellow. On the MP780 there are two pairs of wires and on the MP760 there is just one. The picture above shows these two wire pairs for the MP780 disconnected. These wires go along the underside of the printer to the other side.
Slide the carriage as far right as it will go.
Before you remove the printer mechanism from its base, you should observe the positions of a couple of white cams as seen circled in yellow in this picture:

Don't worry if they come loose while you are removing the printer mechanism, just remember to put them back where they belong when re-assembling. Here is a closeup of the one on the right:

Lift the mechanism up by the metal bar that goes across the top of the printer. As you first start to lift it, some orange cables near the front need to be unpositioned from their plastic guides in the base. Note how they are positioned so that you can get them back in the same orientation. This picture shows how these orange cables are positioned and how you need to return them when you are putting the printer back together:

When you get the printer mechanism removed, this is what you'll see:

Now you can easily remove the waste ink pads and clean up all the residual ink from the various plastic parts. Thoroughly dry it before installing new pads.
You may also want to remove and wash the thin black sponge unit that runs the width of the printer. Also clean the wiper blades and the two purge pads. When you put them back, the notch goes in the left rear corner.
Reassemble the printer by reversing all the steps. To help guide the printer into the base, look at the back of the printer and line up the door into the base unit. Make sure those two white tabs are inserted where they belong and are engaging the proper posts and make sure the orange wires make their way across their restraining tabs. Make sure you plug in the wires that run along the base of the printer.
When putting the printer top on the printer, look at the back again and line up the door into the printer top.

Comments
Thank you for that tip. I'm sure it will be very valuable for future readers.
Thank you very much for your description of the process...and the foto's.I dissambled our printer together with my wife en it went very well.
The costs for repairing would have been very much : let's say the price of two printers. and now i still have my good canon mp 760. costs: € 0,00. After resetting he is working like new. Greetings from the Netherlands. Ludi