Posts

Showing posts with the label Disassembly Instructions

How to Disassemble Canon MP780/MP760 Printer to replace the Waste Ink Pads
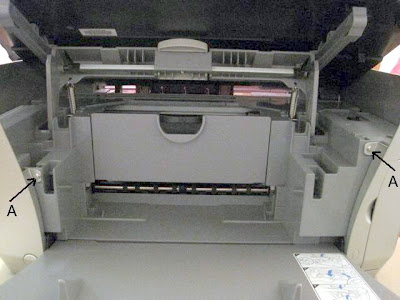
Image
There are four different types of screws and you want to get them back where they came from. To help you keep the screws straight, I have labeled the photographs with letters corresponding to each screw type. Here are the screw types: A: medium length plastic screw. B: short machine screw with integrated washer. C: longer plastic screw with integrated washer. D: shorter plastic screw. Before you attempt this process, you should remove the cartridges, do a deep head cleaning followed by a nozzle check and repeat until nothing prints. Then remove the print head and unplug the printer with the carriage still in the center of the printer. You will need a medium Phillips screwdriver with a long shaft (at least five inches long). Start by removing the two side panels. First remove these two screws from the front of the printer: Canon MP 780 / MP 760 Disassembly Guide Remove these four screws from the rear of the printer: Now pry off the back of each side panel over the two...
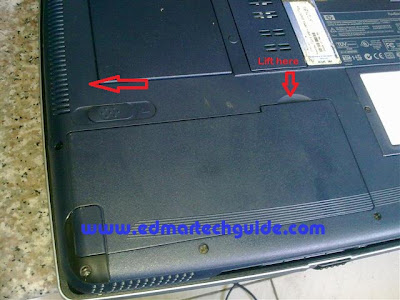
How to Replace Hard Disk Drive and/or CD/DVD Rom Drive of HP Pavilion n5445 | Disassembly Guide

Image
Unlike other laptops, HP Pavilion N5445 hard drive is located under the keyboard. So you will need to remove it first to be able to replace it. Here are the instructions to disassemble this HP Pavilion N5445 laptop: 1. Unplug your laptop's AC adapted and remove the battery. 2. Remove the two (2) screws from the back panel located in the center of each hinge. 3. Open the LCD screen as far back at it goes. Use a small flat screwdriver to remove the top cover. 4. Unscrew the 4 screws that holds the keyboard and gently lift the keyboard. 5. Now you should see the hardrive sitting in the center. Remove the screws (4 of them) on each corner of the hard drive which connect it to the motherboard. 6. Gently lift or pull the hard drive by using the black ribbon at the top of the hard disk drive. 7. Once the hard drive is out, carefully remove the IDE connector that attached the hard disk drive to the motherboard. 8. Turn the hard drive upside down and rem...

IBM Thinkpad R31 Laptop Disassembly | Service Manual

Image
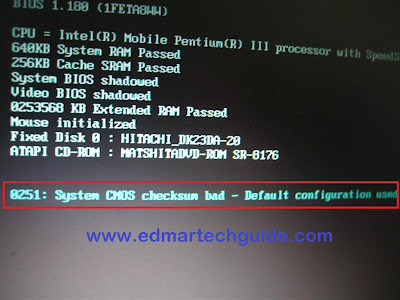
How to disassemble IBM Thinkpad R31 Laptop | How to take apart Thinkpad R31 I recently repaired an IBM Thinkpad R31 Laptop with an error message about CMOS checksum being bad. This error is usually caused by a dead (empty) CMOS battery. This battery lasts for 3 to 5 years. Some says that it even lasts for 10 years. Whatever the case, you will need to replace the CMOS battery (also known as BIOS battery). The CMOS battery is usually located at the motherboard. Some under the laptop compartment while in other models it's located right underneath the keyboard. In the case of IBM thinkpad R31 laptop, it is located under the keyboard. So, you will only need to disassemble the laptop keyboard to have access to the CMOS battery. Here is the exact error message that show up once you open up an IBM Thinkpad R31 laptop that has a CMOS battery problem: Error Message: 0251 System CMOS checksum bad - Default Configuration used Screenshot: Solution: Change the CMOS batt...

Disassembly Guide for Toshiba Portege 3010/3020CT

How to disassemble Toshiba Portege 3010 and 3020CT Here's the field replaceable unit (FRU) documentation or service manual for Toshiba Portege 3010/3020CT. This will be of help for those people who needs to disassemble their Portege 3010 or 3020 CT. Download link

How to Disassemble IBM ThinkPad T20 | IBM Thinkpad T20/T21/T22/T23 Disassembly

Image
Here's a step-by-step guide on how to disassemble an IBM Thinkpad T20 Laptop. This also applies to T21 , T22 , and T23 Series . 1. Remove the battery pack 2. Remove the CMOS battery 3. Open the LCD a little and then remove the hard disk drive . Note that the hard disk is attached to the cover. 4. Remove memory / DIMM For the rest, you can download it here . < Download Link >