Posts

I Just Switched to Linux Mint. Goodbye Windows 7.
Image
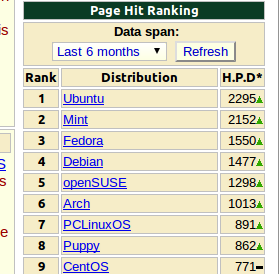
After years of thinking about it, I finally dumped Windows and installed Linux on my laptop (Lenovo Y410). In fact, I'm posting this from my Mint-powered laptop. I choose Linux Mint because of the good reviews I read prior to deciding what my chosen distro will be. Basically it is a fine-tuned Ubuntu. I was surprised to see that Mint is closing in on Ubuntu in terms of popularity according to Distrowatch.com's page hit ranking. The first time I looked at Mint (version 8), it is way behind Ubuntu. But now it is in 2nd place and it looks like it will overtake Ubuntu sooner or later. Why just now? Like I said, this is a plan that started brewing eons of years ago. I'm one of the proponents of Linux. I really  like to get rid of all Microsoft products in my system. But my job as a computer technician makes it impossible. Recent developments with my job is the indirect reason why I just switched now. I recently relocated here in Thailand (Bangkok). I arrived here Janua...
How to Display Adsense Ads Below the Blog Title in Blogger

Image
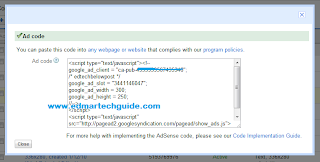
As you can see, I'm monetizing this blog by using Google Adsense. I get paid every time someone clicks an ad. The most effective ad placement for me is the one located under the blog title. I will post here the steps if you want to implement this on your site. Create your desired adsense ads and copy the code. Adsense Code 2. You will need to convert the code because blogger will not accept it. Use postable for that. A very friendly app written by Elliot Swan. Paste it in the box and click on "make it friendly". Don't close it yet, you will need the code later. postable - very handy app 3. Go to Blogger dashboard > click on Design > the Edit HTML. Put a check mark on Expand Widget Templates and search for  .  To do it faster, click on Ctrl+F on your keyboard and find it. 4. Now paste the code from postable above . If you want your adsense ad to float along with the post body, add this code before and after your adsense code:  Put your adse...

Site Redesign

After months of procrastination, I successfully implemented a redesign of this site. The old template is a little quirky and I used it for more than a year already. This time, I decided to use a simple blogger template, one with no bells and whistles because I don't want any incompatibilities to occur now and for the future. I find that the customized templates that are downloadable on the internet are sometimes untrustworthy. The makers usually put hidden codes that you will not notice if you don't inspect the code carefully. And if you find a clean template, you will have a problem sooner or later when blogger updated its design or algorithm. I'm not finish yet on my redesign project but so far I'm already quite satisfied with the results.  I have lot of things to add here. Social media marketing is getting bigger and bigger, and I want to optimize my site for that. I will still add some twitter/facebook/digg/etc gadgets on the sidebar. I'm thinking of adding a ...

Solution: Windows Live Error hr:0x80070643

This problems s eems to be something to do with (a) not having the messenger.msi file in the Installer folder and (b) perhaps not updating Windows Messenger first. This combination seem to fix the problem: 1. Make sure that there is a messenger.msi file in the C:\WINDOWS\Installer folder. 2. If it is not present use the 'Search' function of Windows by tapping F3 and search for the file on your Windows folder. 3. Copy the file into the C:\WINDOWS\Installer folder. 4. Fire up Windows Messenger and log in. 5. If there is a new version available, a message will prompt. Follow the onscreen instruction. 

How to Reset Canon MP760 - Waste Ink Tank Reset Procedure

Problem with your Canon MP760 Waste Ink Tank? Just follow these steps on how to reset it. 1) Press the following keys in sequence: Copy-Menu-Scan-Copy-Scan. The display will say: SERVICE MODE #1 SSSW 2) Press the V key six times. The display will say: SERVICE MODE #7 PRINTER 3) Press OK. The display will say: #7 PRINTER #1 SSSW 4) Press the V key four times. The display will say: #7 PRINTER #5 INK ABS CAPA 5) Press OK. The display will say: SUCTION XX (where XX is how full the waste ink tank is as an integer percentage) 6) Change the XX to 0 by hitting the <> keys as many times as necessary (if you are closer to 99 than 0 it is better to hit the > key until it wraps around to 0). The display will say: SUCTION 0 7) Press OK. The display will momentarily say: SUCTION DATA ENTRY OK and then will quickly change to: #7 PRINTER #6 CDR ADJUST 8) Press the Stop/Reset button And the printer is back to normal.

How to Reset Canon MP780 - Waste Ink Tank Reset Procedure

1) Press the following keys in sequence: Copy-Menu-Scan-Copy-Scan. The display will say: SERVICE MODE #1 SSSW 2) Press the > key (also labeled +) six times. The display will say: SERVICE MODE #7 PRINTER 3) Press OK. The display will say: #7 PRINTER #1 SSSW 4) Press the > key (also labeled +) four times. The display will say: #7 PRINTER #5 INK ABS CAPA 5) Press OK. The display will say: SUCTION XX (where XX is how full the waste ink tank is as an integer percentage) 6) Change the XX to 0 by entering 0. The display will say: SUCTION 0 7) Press OK. The display will momentarily say: SUCTION DATA ENTRY OK and then will quickly change to: #7 PRINTER #6 CDR ADJUST 8) Press the Stop/Reset button And the printer is back to normal.

How to Disassemble Canon MP780/MP760 Printer to replace the Waste Ink Pads

Image
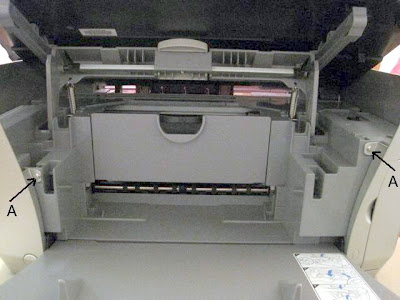
There are four different types of screws and you want to get them back where they came from. To help you keep the screws straight, I have labeled the photographs with letters corresponding to each screw type. Here are the screw types: A: medium length plastic screw. B: short machine screw with integrated washer. C: longer plastic screw with integrated washer. D: shorter plastic screw. Before you attempt this process, you should remove the cartridges, do a deep head cleaning followed by a nozzle check and repeat until nothing prints. Then remove the print head and unplug the printer with the carriage still in the center of the printer. You will need a medium Phillips screwdriver with a long shaft (at least five inches long). Start by removing the two side panels. First remove these two screws from the front of the printer: Canon MP 780 / MP 760 Disassembly Guide Remove these four screws from the rear of the printer: Now pry off the back of each side panel over the two...